![]()
Comparing Versions of Content
There are two versions of this procedure. Consult your system administrator to determine the correct procedure for you.
|
If the Ektron CMS400.NET server is |
And your client is |
See |
|
32 bit |
32 bit |
|
|
64 bit |
32 bit |
The View Content Difference Feature Note: This procedure was the only one prior to 7.5.2. It downloads an ActiveX control to your computer. |
|
64 bit |
64 bit |
The View Content Difference feature is not available |
The View Content Difference Screen
Note: Use this procedure if both your computer and the Ektron CMS400.NET server are 32 bit.
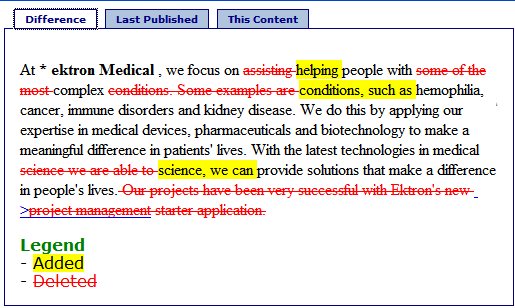
The View Content Difference screen highlights changes to selected content. Below is an example of the View Content Difference screen, showing the default tab, Difference.
Each tab is explained below.
|
Tab |
Shows this content |
|
Difference |
Both versions: content that only appears in the version on the This Content tab is highlighted in yellow content that only appears in the currently published version is red unchanged content is black |
|
Last Published |
Currently-published. |
|
This Content |
The version you are comparing the currently-published content against. |
Note: If there is no difference between the versions, you see Content is Identical.
When Can I Compare Content?
The View Content Difference feature is available when
you are viewing a version of content
a staged version of that content is available (See Also: Staged Content)
Learn About Accessing the View Content Difference Feature
Accessing the View Content Difference Feature
To Access the View Content Difference feature, follow these steps.
1. Navigate to the content whose versions you want to compare.
2. Click View Properties.
3. Click History ( ). The View Content History screen appears. See Also: Comparing Versions of Content
4. Click a version that you want to compare with the most recently published version.
5. Click View Content Difference ( ).
).
The View Content Difference Feature
Note: Use this procedure if your computer is 32 bit, and the Ektron CMS400.NET server is 64 bit.
The View Content Difference feature highlights changes that were made to selected content. Below is an example of the View Content Difference screen, showing two versions of content. The changes are indicated by
redlining deleted content
highlighting in yellow added content
Within the View Content Difference feature, you can perform several tasks, as well as view different versions of the content separately, or compared.
The View Content Difference feature is explained through the following topics:
First Use of the View Content Difference Feature
When Can I Compare Content?
The View Content Difference feature is only available when
you are viewing an historical version of content
a staged version of the content is available (See Also: Staged Content)
The following table explains when you can use the feature, and which versions are compared.
|
Compares current published version with |
|
|
Published |
Historical version stored in the content history area |
|
Checked-In |
Most recently checked-in version |
|
Submitted |
Submitted version |
|
Pending Start Date |
Scheduled version pending start date |
|
Checked Out |
Not available |
If content can be compared with another version, the View Difference button () appears in the content history area or the Web page view.
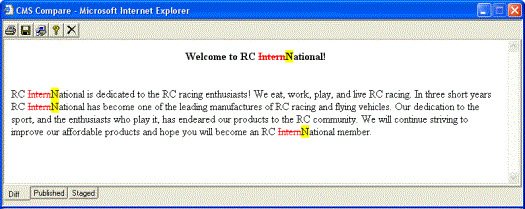
The Compare Content Window
Note: The first time the View Content Difference feature is opened, a simple installation program runs. See Also: First Use of the View Content Difference Feature.
The Compare Content window consists of the following:
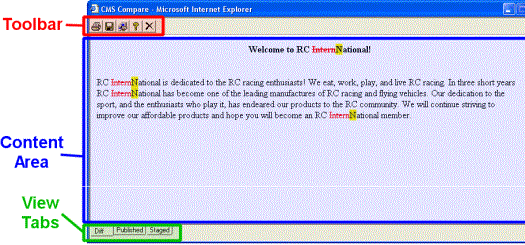
Each area is explained below.
Toolbar
The content comparison toolbar has five buttons, explained below.
|
Button |
Name |
Description |
|
|
|
Sends content to local or network printer. Note: This option prints the currently displayed content, whether it is the compared, published, or staged content. |
|
|
Save |
Saves a copy in HTML format on your local machine or network. When saved as a physical file, the HTML may be edited. However, the changes are not saved to the Web Server. Note: The save option saves the version of the content you are viewing. |
|
|
Setup |
Opens setup dialog box to configure the settings. Typically, only an administrator would use this. For more information, see Setup. |
|
|
Help |
Displays additional information about the compare feature. |
|
|
Exit |
Closes the window. |


Setup
Click Setup ( ) to open the setup dialog box. Typically, a system administrator would edit these settings.

You can change the setup options to better suit your needs. The following table explains each option.
|
Option |
Description |
|
Compare Options |
|
|
Compares content as it would appear on a Web page. |
|
|
Displays compared content as source HTML. |
|
|
Whitespace Options |
|
|
Blank (whitespace) characters are ignored. |
|
|
One or more consecutive whitespace characters are treated as a single separation sequence. That is, multiple whitespace characters are ignored. |
|
|
Blank (whitespace) characters are treated as any other character. |
|
|
Other Options |
|
|
Determines whether comparison is case sensitive. For example, if you check this box, the strings “Bob” and “BOB” are not highlighted because their only difference is the case of the characters. |
|
|
Determines whether comparison ignores changes in text-formatting attributes (HTML Visual Analysis only). |
|
After updating setup information, click OK to save changes.
Content Area
The content area displays the content comparison.
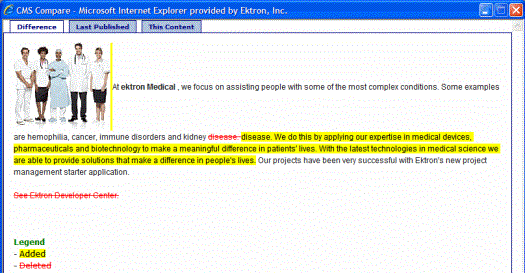
The following table describes the change indicators.
|
Symbol |
Example |
Content state |
|
Plain black text |
|
Unchanged |
|
Yellow highlighted text |
|
Added |
|
Red, struck-through text |
|
Deleted |


View Tabs
When viewing content in the View Content Difference feature, there are three view modes, explained below.
|
View |
Description |
|
Compares published version of content to staged version |
|
|
Displays currently published version |
|
|
Displays the staged version of content. See Also: Staged Content |
To switch between views, click the corresponding View tab.
First Use of the View Content Difference Feature
The first time the View Content Difference screen is used on a client machine, a simple installation program is performed.
Click Yes when the following screen appears.
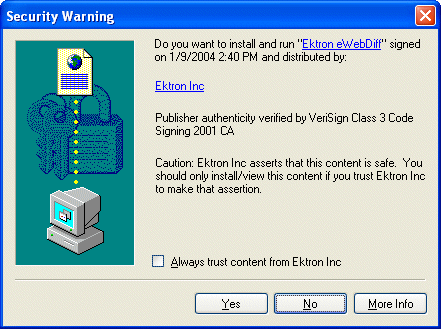
When the installation program completes, close and reopen the View Content Difference feature.
Actions are explained below.


![]()